WordPress provides an intuitive admin dashboard that lets you build, manage, and publish websites easily — even without any coding skills. While WordPress is already powerful on its own, integrating it with the low-code automation platform n8n can take your website management to the next level by fully automating routine tasks.
Once you have both platforms ready, most WordPress-n8n integrations follow just four simple steps:
- Generate WordPress REST API credentials using an admin account.
- Create a basic WordPress workflow in n8n.
- Add and configure the WordPress node.
- Test the workflow to ensure everything works as expected.
With this integration, you can automate tasks like creating posts with AI, sharing new content on social media, tagging blog articles, and categorizing posts — all without lifting a finger.
Let’s dive deeper into how to automate WordPress with n8n and explore practical workflows that can save you hours every week.
What Is n8n and How Does It Help WordPress?
n8n (pronounced “n-eight-n”) is an open-source automation tool that lets you connect different apps, APIs, and online services without writing complicated code. You can think of it as a visual workflow builder — a place where you can drag, drop, and link different tools together to make them work automatically.
If you’ve used platforms like Zapier or Make (Integromat) before, n8n works in a similar way — but it’s more flexible, open-source, and self-hostable. That means you can run it on your own server, have no limits on the number of workflows (or “nodes”), and fully control your data and automations.
When I started using n8n with my WordPress website, I quickly realized how much time it could save. Here are a few things I now automate effortlessly:
- Automatically creating and publishing posts.
- Using AI to generate or categorize blog content.
- Sharing new articles on social media as soon as they go live.
- Managing WooCommerce orders, confirmations, and emails.
- Collecting leads from contact forms and sending them directly to a CRM or email list.
In short, n8n helps me turn repetitive website tasks into automated workflows. Everything that used to take me hours — posting updates, sending emails, sorting data — now happens in the background while I focus on more important work.
Why Automate WordPress with n8n?
WordPress already comes with features like post scheduling and automation plugins, but most of them are limited to one specific task — such as publishing a post at a set time or sharing it on social media. That’s where n8n makes a big difference.
With n8n, you can build custom workflows that connect WordPress with almost any app, service, or AI tool you use. It’s like creating your own personal assistant that works 24/7 in the background.
Here’s why I find automating WordPress with n8n so useful:
- Saves Time: No more doing the same repetitive tasks — like creating posts, adding tags, or sharing content — by hand.
- Scales Easily: Whether you manage one website or ten, n8n can handle all your automations without adding extra work.
- Custom Workflows: You can connect WordPress to Gmail, Google Sheets, Slack, ChatGPT, or any other API to make your site smarter.
- AI Integration: You can use AI tools to generate content ideas, write short summaries, suggest tags, or categorize posts automatically.
In short, n8n gives me complete control over what I want to automate — from publishing posts to managing WooCommerce orders — without relying on multiple plugins or paid tools.
Prerequisites Before Connecting WordPress to n8n
Before you start automating WordPress with n8n, there are a few things you’ll need to set up first. Don’t worry — it’s simple, and you only have to do it once.
Here’s what you’ll need:
- A WordPress website with admin access — You’ll need this to generate API credentials and connect with n8n.
- n8n installed — You can either use the n8n Cloud (hosted by the n8n team) or set it up yourself on a server (self-hosted version).
- Application Passwords enabled in WordPress — This allows secure connections between n8n and your WordPress account without using your main password.
- REST API access — WordPress uses its REST API to let external tools (like n8n) interact with your website’s content.
To check if your WordPress REST API is active, simply open this link in your browser:
https://yourwebsite.com/wp-json
If you see a page filled with JSON data (text and symbols), that means your REST API is working correctly.
If you get an error like “403 Forbidden”, don’t worry — just make sure your WordPress version is up to date or enable REST API access manually through your hosting or security settings.
Once everything above is ready, you can start creating your first WordPress automation workflow in n8n.
How to set up a WordPress node in n8n to create posts
Step 1: Generate WordPress REST API Credentials
To connect WordPress with n8n securely, you’ll need something called an Application Password. It’s like a special key that lets n8n perform actions (like creating posts or fetching data) on your site — without needing to log in with your main WordPress password.
Here’s how to create one:
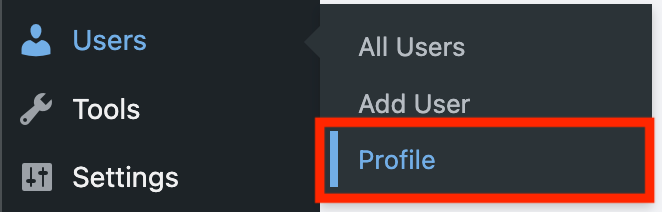
- Log in to your WordPress Admin Dashboard.
- From the left menu, go to Users → Profile (or Your Profile).
- Scroll down until you find the Application Passwords section.
- In the field that says “New Application Password Name”, enter something descriptive like
n8n-automation. - Click the Add New Application Password button.
- WordPress will instantly generate a password — copy and save it somewhere safe because it will not be shown again.
That’s it! You’ve successfully created your API credentials.
You’ll use your WordPress username and this Application Password later when setting up the WordPress connection in n8n. This ensures a secure and smooth connection between the two platforms.
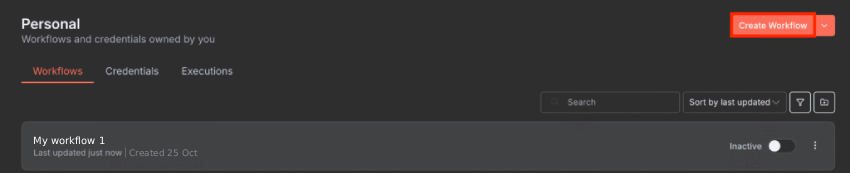
Step 2: Create a Workflow in n8n
Now that your WordPress connection is ready, it’s time to build your first workflow in n8n.
A workflow in n8n is a sequence of automated actions that run based on specific triggers.
Think of it like a digital assistant — when something happens (like a new blog post or a scheduled time), n8n automatically performs the tasks you’ve set up.
For example, I wanted n8n to create new WordPress posts automatically using AI-generated content. Here’s how I did it step by step:
Here’s what I did:
- Log in to your n8n dashboard.
- Click “Create Workflow.”
- Add a Trigger Node — this decides when your automation will start.
Example: Choose “Cron” or “On Schedule” if you want it to run daily or weekly. - Add a WordPress Node — this node will perform actions on your WordPress site, such as:
Creating a new post
Updating an existing post
Fetching posts or comments - (Optional) Add other nodes depending on what you want your workflow to do:
AI Node for generating content or titles automatically
Gmail Node to send yourself a notification
Google Sheets Node to log all published posts
Slack Node to share updates with your team
The best part? You don’t need to write a single line of code. The drag-and-drop visual interface makes it incredibly easy — just connect the nodes, set your conditions, and n8n takes care of the rest.
Once this workflow is ready, you can move on to the next step — connecting it to your actual WordPress site and testing the automation.
Step 3: Configure the WordPress Node
Once your workflow is set up, it’s time to connect it to your actual WordPress site. This step is where you tell n8n what to do in WordPress — like creating a post, updating content, or fetching data.
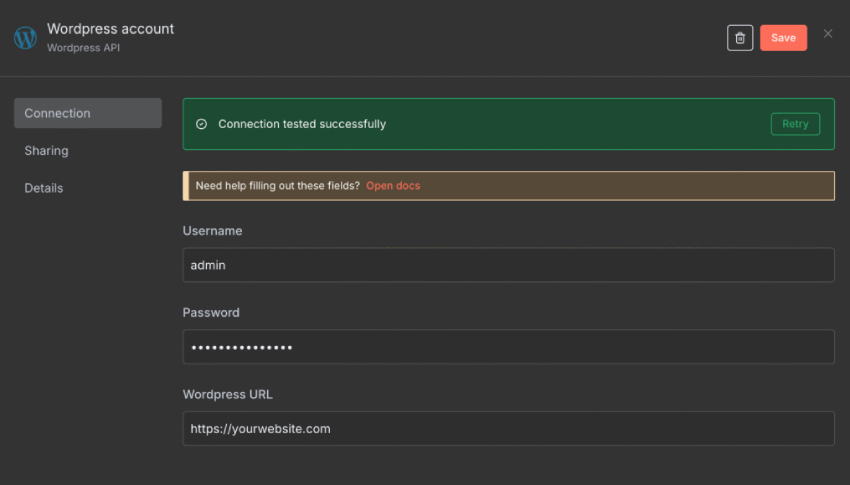
Here’s how to configure the WordPress Node:
- Click on the WordPress Node in your workflow.
- Under Credentials, click “Create New Credential.”
- You’ll be asked to enter:
Username – Your WordPress admin username.
Application Password – The one you created earlier.
WordPress Site URL – Example:https://yourwebsite.com - Once connected, choose what action you want the node to perform. You’ll see options such as:
Create Post – Publish a new article automatically.
Update Post – Edit an existing post.
Create User – Add new users or authors.
Get Posts – Retrieve existing content from your site.
For example, if you want to create a post automatically, here’s a simple setup:
Title: {{ $json["title"] }}
Content: {{ $json["content"] }}
Status: publish
Those curly brackets (called expressions) pull data from previous nodes — like an AI content generator or a Google Sheets entry.
So if your AI node creates an article with a title and body, the WordPress node will take that data and publish it automatically — no manual copy-pasting required.
Once everything is configured, save your settings. You’re now ready to test your automation in the next step.
Step 4: Test the Workflow
Before letting your automation run on its own, it’s very important to test it first. Testing ensures everything is working correctly — so your posts, users, or updates appear exactly as expected on your WordPress site.
Here’s how to test your workflow in n8n:
- Click the “Execute Workflow” button at the top-right corner of your n8n screen.
- Watch the nodes (the boxes in your workflow).
If they turn green, it means each step was successful.
If any node turns red, it indicates an error that needs fixing. - Once it runs successfully, go to your WordPress Dashboard and check if the action worked.
For example, if you created a post, it should now appear under Posts → All Posts.
If you updated a post or created a user, you’ll see those changes reflected too.
Common Issues and Quick Fixes:
- Wrong Credentials: Double-check your WordPress username, password, and site URL.
- User Permissions: Make sure the account you used is an admin — only admin users can perform all API actions.
- REST API Not Working: If your workflow fails to connect, ensure that your REST API is enabled. Update WordPress or review any security/firewall settings blocking API requests.
Once your test runs successfully, your workflow is ready to go live! You can now schedule it to run automatically — daily, weekly, or whenever you choose.
Practical Examples of WordPress Automation with n8n
Once I got comfortable using n8n with WordPress, I started exploring what else I could automate — and honestly, it’s impressive how much time it saves. Below are some real examples of how I use n8n workflows to simplify my daily WordPress tasks.
1. Auto-Generate WordPress Posts Using AI
Writing content manually for every post can take hours. With n8n, I connected my WordPress site to OpenAI (ChatGPT) and Claude.ai to generate content automatically.
Here’s how my workflow works:
- Trigger: Runs every day at a scheduled time (using the “Cron” or “Schedule” trigger node).
- AI Node: Generates a topic and full article content.
- WordPress Node: Creates a new post draft with that AI-generated content.
- Social Media Node: Shares the new post automatically on selected platforms.
This single workflow ensures my blog stays active with fresh content, even on days when I don’t have time to write. It keeps posting consistent — something that’s great for SEO and audience engagement.
2. Auto-Share New Posts on Social Media
Manually sharing every new post across multiple social networks can be tiring and easy to forget. I automated this completely using n8n.
Here’s the setup:
- Trigger: When a new post is published in WordPress.
- AI Node: Automatically generates a catchy caption or summary.
- Social Media Nodes: Instantly shares the post on Twitter (X), LinkedIn, and Facebook.
- Optional: Logs the post details (title, link, and date) into a Google Sheet for record-keeping.
Now, whenever I hit “Publish” on WordPress, my post automatically goes live on all my social profiles — no copy-pasting links, no scheduling tools needed.
3. Auto-Tag and Categorize Blog Posts Using AI
Keeping your site organized with accurate categories and tags is great for SEO, but doing it manually can be repetitive — especially if you publish frequently.
Here’s the automation I set up:
- Trigger: A new post is created.
- AI Node: Analyzes the content of the post and determines the most relevant tags and categories.
- WordPress Node: Updates the post with those AI-suggested tags and categories automatically.
This makes my content properly categorized and SEO-optimized without me spending extra time thinking about keywords or organization.
4. Manage WooCommerce Orders Automatically
If you’re running an online store using WooCommerce, automation can make a huge difference in managing orders and customers. I used n8n to automate many parts of the order process:
- Automatically send a Slack or Discord notification whenever a new order is placed.
- Add every new order to a Google Sheet for tracking and reporting.
- Send a personalized thank-you email to customers through Gmail or another email node.
- Update inventory or stock levels automatically after each order.
These automations reduced manual tasks and human errors in my eCommerce operations — saving me several hours every week.
5. Automate Lead Management from Forms
If you use forms on your website (like WPForms or Contact Form 7), n8n can handle your leads automatically so you never miss one again.
Here’s what I built:
- Trigger: A user submits a contact form.
- Google Sheets Node: Saves the lead details (name, email, message).
- Gmail Node: Sends an automatic personalized thank-you or confirmation email.
- CRM Node: Adds the lead to a CRM system like HubSpot or Zoho for follow-up.
Now, every form submission is stored, acknowledged, and followed up automatically — without me having to check my inbox constantly.
These are just a few examples, but the possibilities are endless. Whether it’s content creation, eCommerce management, or lead tracking, n8n can automate almost any repetitive WordPress task — freeing up time for the things that actually matter.
Advanced Automation Techniques
Once I got comfortable with the basics of n8n, I started exploring its advanced capabilities to make my workflows even more powerful and intelligent. These advanced automation techniques help create smart, dynamic workflows that can adapt to real-world use cases — from content creation and scheduling to complex multi-app integration.
1. Conditional Workflows
Not every automation should run the same way every time. Sometimes, you need to perform different actions based on certain conditions — like whether a blog post meets SEO requirements or if a form submission includes specific data.
That’s where If, Switch, and Merge nodes come in handy.
Example use case:
- If the AI-generated article has a word count below 600 → Send it back for editing.
- If the category is “Product Review” → Publish it on WordPress.
- Otherwise → Save it as a draft for manual approval.
These conditional nodes allow workflows to “think” before they act — preventing errors and ensuring each automation runs with logic and precision.
2. Scheduled Workflows
Automation isn’t just about reacting — it’s about planning ahead. With Cron or Schedule Trigger nodes, you can run workflows automatically at specific intervals.
Example use case:
- Post one blog every day at 9 AM automatically.
- Send weekly content reports every Friday.
- Run a monthly backup workflow for all published posts.
Scheduled workflows remove the need for manual execution, ensuring your website stays active and consistent — even when you’re away.
3. Error Handling
In real-world automation, things can (and will) go wrong — maybe an API times out, credentials expire, or a node fails unexpectedly. Instead of letting the workflow stop entirely, n8n lets you handle errors intelligently.
You can use:
- Error Trigger Node: To run specific actions when a node fails (like sending a Slack alert).
- Retry Node: To attempt failed requests automatically before giving up.
- Continue On Fail: To skip errors and move forward with other actions.
This ensures your automation remains stable and resilient, even when external systems behave unpredictably.
4. Multi-Step Automation
The true power of n8n shines when you chain multiple tools together in one seamless flow. You can connect AI, WordPress, and third-party platforms like Slack, Trello, Google Sheets, or Gmail — all inside one automation.
Example workflow:
- Generate article ideas using AI (OpenAI Node).
- Save titles and outlines to Google Sheets.
- Use another AI step to write the full content.
- Post it automatically on WordPress.
- Notify your team on Slack once it’s live.
This kind of end-to-end automation not only saves time but also builds a complete ecosystem where every task connects logically, without manual intervention.
Benefits I Experienced Using n8n with WordPress
| Benefit | My Experience |
|---|---|
| Save time | Automate repetitive tasks daily |
| Reduce errors | Automation ensures no missed posts or orders |
| Scale easily | Manage multiple sites & workflows |
| Consistent posting | AI-generated posts maintain schedule |
| Full control | Self-hosted option keeps data private |
| Flexible integration | Connect any app or service |
Common Pitfalls and How to Avoid Them
While n8n is incredibly powerful, I’ve learned that beginners often run into some common mistakes when automating WordPress. Knowing these pitfalls and how to avoid them can save a lot of frustration and ensure your workflows run smoothly.
1. Incorrect Credentials
One of the most common issues is using the wrong WordPress credentials. If your username, password, or application password is incorrect, the workflow will fail immediately.
How I avoid it:
- Double-check my admin username and application password.
- Ensure I copy the application password exactly as generated (WordPress won’t show it again).
- Always test the credentials in the WordPress node before building a complex workflow.
2. Using Non-Admin Accounts
Not all WordPress users have the same permissions. Using an account without admin privileges can cause actions like creating posts, adding users, or updating settings to fail.
How I avoid it:
- Always generate application passwords using an admin account.
- If I need limited access, I create separate workflows with specific permissions to prevent accidental changes.
3. REST API Issues
The WordPress REST API is the backbone of automation. If it’s disabled or restricted, workflows won’t work. Some common API-related problems include 403 errors, plugin conflicts, or outdated WordPress versions.
How I avoid it:
- Verify the REST API by visiting
https://yourwebsite.com/wp-json. - Update WordPress and disable conflicting plugins.
- Enable the REST API manually if required.
4. Overcomplicating Workflows
Beginners sometimes try to do too much at once — like integrating AI content, social media posting, email notifications, and CRM updates in a single workflow. This can make debugging extremely difficult.
How I avoid it:
- Start small with one task at a time.
- Test each step individually before combining nodes.
- Use separate workflows for separate automation purposes (e.g., one for posts, one for emails, one for social sharing).
5. Ignoring Error Handling
A workflow failure can break the entire automation if you don’t account for errors. Without proper error handling, you might lose posts, emails, or data updates.
How I avoid it:
- Add Error Trigger nodes to log failures.
- Use Retry settings for nodes that may fail intermittently.
- Regularly monitor workflow execution logs to catch problems early.
6. Forgetting Testing Before Going Live
I’ve seen workflows fail because they weren’t properly tested. Skipping tests can result in accidental posts going live, emails being sent incorrectly, or even corrupted data.
How I avoid it:
- Always execute the workflow in test mode first.
- Check if all nodes turn green.
- Confirm that posts, emails, or other actions appear as expected in WordPress and external apps.
7. Not Documenting Workflows
As workflows grow in complexity, it’s easy to forget what each node does. Without documentation, troubleshooting or scaling becomes much harder.
How I avoid it:
- Add notes to each node describing its purpose.
- Keep a workflow map or diagram for larger automations.
- Maintain version history in case I need to revert changes.
Beyond WordPress: Expand Automation with n8n
After mastering WordPress automation, I started connecting other tools:
- Email Marketing: Mailchimp, Brevo
- CRM: HubSpot, Zoho
- Project Management: Notion, Trello
- AI Tools: OpenAI, Hugging Face
Now, my website, marketing, and AI tools work together seamlessly — a fully automated ecosystem.
Tips for Beginners
- Start with small workflows, like posting a single blog automatically.
- Test before going live — mistakes can update content unintentionally.
- Use AI nodes cautiously at first — focus on ideas and suggestions.
- Keep WordPress updated and REST API enabled.
- Document workflows for scaling or troubleshooting.
Final Thoughts
If you’re managing a WordPress website, I highly recommend trying n8n. It removes repetitive tasks, integrates AI, and allows you to automate nearly everything — from content creation to social sharing to WooCommerce management.
For me, n8n isn’t just a time-saver, it’s a game-changer. I can focus on growing my site and creating better content while automation handles routine tasks. Whether you’re a blogger, marketer, or eCommerce owner, n8n makes WordPress management smoother, faster, and smarter.